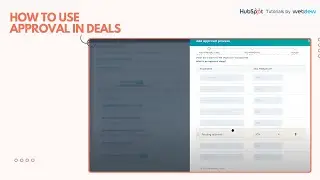
How to enable Content Approval with Security Health Check
Want to streamline your content approval process and eliminate the headaches? You can enhance your content approval game on HubSpot with just a few simple steps.
Watch this video to learn how!
1. Click on the settings icon in the top navigation bar.
2. Select Approvals in the left sidebar menu.
3. Navigate to Website and select Set up approvals for blogs, website pages, or landing pages.
4. Under the "Choose who can skip approvals" section, choose an option that allows certain users to publish content without needing approval.
5. Click Next.
6. Turn on approvals and click Done.
7. On the top navigation bar, select the settings icon.
8. Select Users and teams in the left sidebar.
9. Hover over a user and click the Edit permissions option.
10. Click on Choose Permissions.
11. Click on the Marketing tab in the left panel.
12. Turn on Marketing access by toggling the switch.
13. Expand the Approvals section.
14. Switch on the Approve toggle for each type of content you want the user to approve.
15. Click Save.
By following these steps, you can streamline your content approval process, ensuring smooth and efficient content management in HubSpot.
#HubSpot #ContentApproval #Marketing #HubSpotTutorials
-----------------------------------------------------------------------------------------------------------
Get FREE HubSpot Demo: https://bit.ly/3VEuefE 🚀
Sign up for HubSpot's Free CRM: https://bit.ly/3VJkLn6 📈
Outsource your HubSpot needs: https://bit.ly/4axdafI 💼
Subscribe to our weekly newsletter: https://bit.ly/3PERwhi 📬
Let's elevate your HubSpot journey together! 😊💡🌟🚀📈