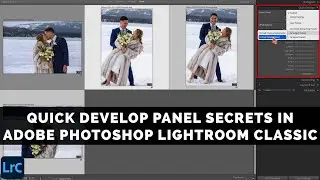
QUICK DEVELOP Panel SECRETS In Adobe Photoshop LIGHTROOM CLASSIC
The Quick Develop panel, inside of Adobe Photoshop Lightroom Classic, is a great way to enhance your photographs without switching back and forth between the Library and the Develop modules. Quick Develop can save you a lot of time but this panel is full of secrets.
Here are some of the User Interface secrets of the Quick Develop panel:
Clicking the double arrow buttons will increase or decrease the Exposure slider in the Develop module by a full stop.
Clicking the single arrow buttons will increase or decrease the Exposure slider in the Develop module by one-third of a stop.
Clicking the double arrow buttons will increase or decrease the Contrast, Highlights, Shadows, Blacks, Whites, Saturation, and Vibrance slider values in the Develop module by 20.
Clicking the single arrow buttons will increase or decrease the Contrast, Highlights, Shadows, Blacks, Whites, Saturation, and Vibrance slider values in the Develop module by 5.
Shift + click on one of the single arrow buttons will increase or decrease that slider in smaller increments (1/2 of the values stated above).
Hold down the Alt / Option (Mac) or the Alt (Win) to reveal the hidden Clarity and Vibrance options.
Making Relative Adjustments
One of Quick Develop’s big secrets is that it makes relative, or cumulative, adjustments to your images. Changes that you make using the tools inside of this panel are added to, or subtracted from, whatever develop settings your image already contains.
Let’s say you have five images that are all slightly underexposed. If you tried to change the exposure on each of these images using Classic’s Synchronize Settings command then you would end up forcing the same exposure value onto each of these images.
Copying and pasting Develop settings from one image to another in Lightroom Classic produces uniform results. Ordinarily, copying and pasting forces all of your images to take on the same settings as the active (most selected) image.
But with the Quick Develop panel, you can add one-third of a stop, or more, of additional exposure onto each image without forcing all of them to use the exact same level of brightness.
Applying Develop Presets
The Quick Develop panel also makes it easy to apply Develop Presets onto your images. This can be a huge time saver since you can apply a Develop Presets to a group of selected images without leaving the Library Module. This trick really shines when you use it to apply sophisticated Develop Presets that activate Lightroom Classic’s amazing AI-powered Masking tools.
Chapters
0:00 Introduction
0:23 Quick Develop Interface Tricks
1:05 Develop Module Review
2:55 Relative Changes with Quick Develop
5:20 Applying Presets with Quick Develop in Lightroom Classic
7:50 Conclusion
------------
Learn Adobe Photoshop Lightroom Classic, Adobe Lightroom (Cloud-Based) Adobe Lightroom for Mobile, or Snapseed from Google with our complete video training courses at http://www.focusphotoschool.com.
FocusPhotoSchool.com subscribers receive unlimited access to hundreds of in-depth video tutorials from Adobe Certified Lightroom / Photoshop Expert David Marx.
Visit our website today to take your photography to the next level!