How to Make Gold in Unreal Engine - Materials Overview - UE5: The Intermediate Course Lecture 1
Want to learn Unreal Engine? Use the following link for a huge discount on a 10-hour Unreal Engine 5 Beginner's course: https://www.udemy.com/course/unreal-e...
Or, use the following link for a huge discount on a 19-hour Unreal Engine 5 Intermediate course: https://www.udemy.com/course/unreal-e...
Welcome to the Intermediate course! The entire course uses Unreal Engine 5.2. Since I can’t foresee what the changes will be, the only way to guarantee that the software matches perfectly with what you see in the course is for you to download and use version 5.2, which I highly recommend.
So, at this point in your education, you should have a basic idea of what a Material is - an asset you can add to certain types of Actors to make that Actor look like it’s made of, or at least covered with, a certain type of substance. But how are Materials constructed and how do you create new ones? These are the questions we are going to answer in detail in this section. But first, in this lecture, we’re just going to do a quick overview of the Material system in Unreal, before digging deeper into the subject in the subsequent lectures. And if you like to follow along at home, to get to this point, I created a new, Blank, game Project that includes the Starter Content. And then I created a new, Basic, Level, which I then saved in the Content folder under the name “NewMap.”
Alright, so to get started, let’s first take a quick look at a Material that has already been built, so we can see how it was constructed. In the Content Browser, you can double-click on a Material asset to open it in the Material Editor. For example, in the Materials folder of the Starter Content, I’m going to double-click on this M_Basic_Wall Material. So now we’re in the Material Editor and we can see how this Material was constructed.
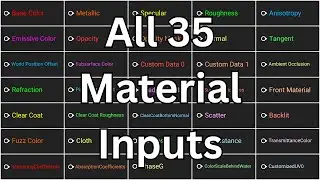
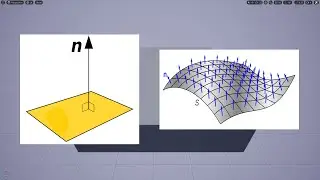
Materials use a node-based graph similar to Blueprints. Every Material will contain this Material Inputs node, which has a variety of inputs, with each one representing a physical characteristic of the Material. And then the Material is constructed by connecting values to these inputs. So this is a rather simple Material, that simply provides a value for the color of the Material and a value that specifies how rough the Material should appear.
To add nodes to the graph, you can right-click in the graph to bring up a node menu, just like in the Blueprint Editor, or you can drag-and-drop nodes from the Palette window on the right.
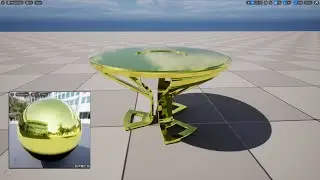
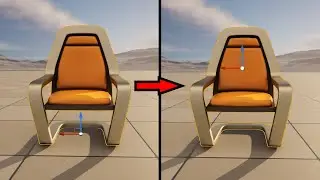
In the upper-left, is a Viewport window where you can preview what the Material will look like. By using the row of buttons in the bottom-right, you can select the shape of the Mesh that the Material preview will be applied to. By default, it is a sphere, but you can also change it to a cylinder, plane, cube, or you can use the last button to select a specific Mesh. So I’m going to go to the Content Browser, browse to the Props folder, and then select the chair. And now if I click on this button with the chair selected, it will use the chair as the preview Mesh.
Okay, so you can also click inside the Viewport and drag the mouse to adjust the camera, like you can in the Viewport of the Level Editor, except the controls are a bit different. If you left-click and drag, it will rotate the camera around the preview mesh, like so. If you right-click and drag, or scroll the MMB, it will zoom the camera. If you click the MMB and drag, it will pan the camera.
And finally, just like the Viewport of the Level Editor, this Viewport also has a row of buttons at the top where you can set the Viewport Options, change the perspective, set the View Mode, and toggle some Show Flags.
And then, in the bottom-left of the Material Editor is the Details panel. If you click in an empty part of the graph, or select the Material Inputs node, you can use the Details panel to set the properties of the Material itself. If you select any other node, you can set the properties of that specific node.
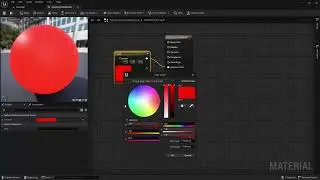
Okay, so now, I’m going to close this Material, and I’m going to show you how to create and build a new one. Specifically, I’m going to attempt to make a gold Material. So first, I’m going to go to the Content folder in the Content Browser so that it gets created there. And now, to create a new Material, from within the Content Browser, you first need to open the Add New menu, by either clicking the Add button, or by right-clicking in the folder. And then, you simply click on Material. You can then give the Material a name. So I’m going to name this “MyGoldMaterial” and then double-click on it to open it in the Material Editor.

![[FREE] SLIMESITO x BEEZYB TYPE BEAT 2022 -](https://images.videosashka.com/watch/1EoTITwenvE)