Normal Maps - Unreal Engine 5: The Intermediate Course Lecture 4
Want to learn Unreal Engine? Use the following link for a huge discount on a 10-hour Unreal Engine 5 Beginner's course: https://www.udemy.com/course/unreal-e...
Or, use the following link for a huge discount on a 19-hour Unreal Engine 5 Intermediate course: https://www.udemy.com/course/unreal-e...
In this lecture, we’re going to take a look at the Normal input of a Material, which is used to define a type of texture known as a normal map.
In the world of 3D-modeling, normal maps are a memory-efficient way to add small details to a 3D object. They allow you to define things like small bumps, cracks, crevices, and ridges, in a way that is much more cost-effective than the regular way of defining things in 3D space. This is achieved through a lighting trick, where you can set a rotation for each individual pixel of the surface of the object, and the shading of that pixel will be based on that rotation.
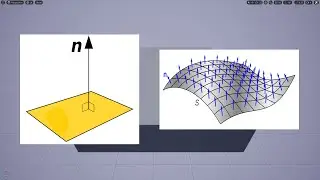
Alright, so to fully understand what this means, you first need to understand what is meant by the term “normal.” In geometry, a normal refers to the vector, or direction, that is perpendicular to the surface of an object at any given point. So, for example, if we have this flat surface here, then the normal at any point is this vector coming straight up here. And then, if we have a curved surface, such as this one, there are different normals at different points, but again, each one is simply the vector perpendicular to the surface at that point.
Okay, so usually when a Material is applied to a surface, each pixel of the Material will have the same normal as the pixel of the surface that it is applied to. Another way of putting this is that the pixels of the Material are perfectly parallel with the pixels of the surface. But by using a normal map, you can change the normal of each pixel of the Material relative to the surface, which will change how light reflects off of that pixel.
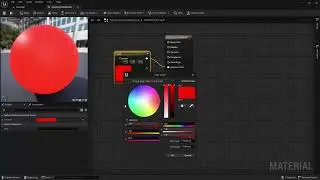
I’ll show you the exact math in a moment, but for now, just know that a color value of (0.5, 0.5, 1), which corresponds to (128, 128, 255) in most 2D image programs, is equal to the vector exactly perpendicular to the surface, or, in other words, it is the same vector that is used by default as the normal. And that’s why you will see this light purple color predominantly used in the type of normal maps that Unreal uses - because it corresponds to the default normal, or the areas of the Material where there should be no change.
So then imagine that I make the entire image this color. By doing so, when I import this image in as a Texture and connect it to the Normal input of my Material, it won’t have any effect on the Material, because all the normals will still point in the same direction.
So it’s not necessary to memorize the following, as I’ll explain shortly, but if you’re curious, the math for converting between color and vector in Unreal Engine works like this. To convert from a color to a vector, multiply by 2, then subtract 1. To convert from a vector to a color, divide by 2, then add 0.5. So this is why the light purple color results in the default normal. The color values in most image programs go from 0 to 255 instead of 0 to 1. So to convert between these two color types, you either divide by 255 or multiply by 255.
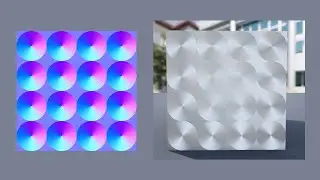
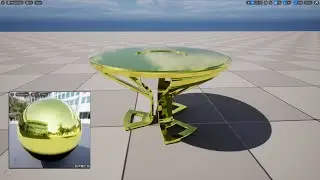
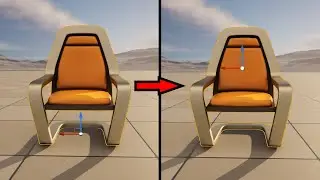
I’m going to use this Texture as my normal map for this Material, so I’m going to connect it to the Normal input. And now you can see in the preview of the Material that this mesh appears to have a lot of three-dimensional detail in it, even though it’s actually just a flat surface. So by using a normal map, this mesh now has the appearance of a lot of detail, but will still have the performance of a simple, flat cube.
So how do you go about creating normal maps? One way is to create them manually, like I just demonstrated a moment ago, in a 2D image program such as Photoshop, and just paint the colors yourself. So this can work for very simple normal maps, but for normal maps with any kind of complexity, you will want to have them auto-generated from software.
Luckily, there is a way to have the software automatically generate a much simpler form of this mesh, along with a normal map that can be applied to it, to give you the same result. So it might generate a simpler form of the mesh that looks like this. So you would import this mesh and the normal map image into Unreal Engine. And then you could create a new Material, connect the normal map to the Normal input, and then when you applied the Material to the Mesh, it would end up looking like this.
And that will conclude the lecture on normal maps.

![[FREE] SLIMESITO x BEEZYB TYPE BEAT 2022 -](https://images.videosashka.com/watch/1EoTITwenvE)