🌐Azure Data Factory Series: Step-by-Step Deployment from Azure Portal🌐
Introduction 🌟
Welcome to our latest installment in the Azure Data Factory Series! In this video, we're diving deep into the step-by-step process of deploying Azure Data Factory using the Azure Portal. Whether you're new to Azure or an experienced data professional, this guide will help you navigate the deployment process with ease. 🚀
Azure Data Factory (ADF) is a powerful cloud-based integration service that allows you to create, schedule, and orchestrate data pipelines. Deploying it from the Azure Portal is the first step toward unlocking its full potential for your data workflows. In this video, we’ll walk you through every detail, ensuring you have a smooth and successful deployment experience. 😊
Why Azure Data Factory? 🤔
Before we dive into the deployment process, let's briefly discuss why Azure Data Factory is a game-changer for data integration and transformation:
Scalable and Flexible: ADF allows you to scale your data integration services as needed, handling everything from simple ETL processes to complex data workflows. 📈
Seamless Integration: With native support for a wide range of data sources and services, ADF enables seamless data integration across on-premises and cloud environments. 🌐
Cost-Effective: Pay only for what you use, making it a cost-efficient solution for organizations of all sizes. 💸
Comprehensive Monitoring: ADF provides end-to-end monitoring, giving you full visibility into your data pipelines and helping you troubleshoot issues quickly. 👀
Built for the Future: As data landscapes evolve, ADF’s features and capabilities ensure that you’re always ahead of the curve. 🛠️
Step 1: Accessing the Azure Portal 🌐
To start, you’ll need to log in to the Azure Portal. If you don’t already have an Azure account, you can easily sign up for a free trial, which gives you access to a range of Azure services.
1.1 Head over to portal.azure.com and log in with your credentials. 🖥️
1.2 Once logged in, you'll be greeted by the Azure Dashboard. This is your central hub for managing all Azure services. Click on the Create a resource button to begin. ➕
Tip: Bookmark the Azure Portal for quick access to all your cloud services! 🌍
Step 2: Creating a New Azure Data Factory 🏗️
Now that you’re in the Azure Portal, it's time to create your Azure Data Factory.
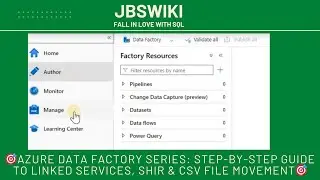
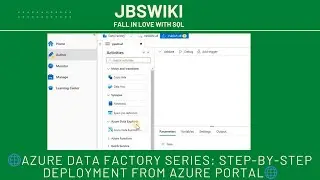
2.1 In the Create a resource section, search for Data Factory in the search bar. 🛠️
2.2 Select Data Factory from the search results and click on the Create button to start the setup process. 🆕
2.3 You’ll be prompted to enter basic information about your Data Factory, such as the Subscription, Resource Group, Region, and Name of your ADF instance. 📝
Key Points:
Subscription: Choose the subscription under which the ADF will be deployed.
Resource Group: Either select an existing resource group or create a new one. Resource groups help organize and manage related resources. 📂
Region: Select a region that is geographically close to your data sources to minimize latency. 🌍
Name: Give your Data Factory a unique and descriptive name. This name should be globally unique across Azure. 🆔
2.4 After filling in the details, click on Next: Git configuration to proceed. 🚀
Step 3: Configuring Git for Source Control 🛡️
Configuring Git integration with your Azure Data Factory allows you to version control your data pipelines, making it easier to manage changes and collaborate with your team.
3.1 On the Git configuration page, you can choose to set up Git integration now or skip this step and configure it later. For this tutorial, we’ll configure it. 🔄
3.2 Select Configure Git later if you don’t want to set it up now, or choose Set up code repository to proceed. 🗂️
3.3 If setting up Git, enter the following information:
Repository Type: Select Azure DevOps Git or GitHub depending on where your repository is hosted.
Organization Name: Enter the name of your organization in Azure DevOps or GitHub. 🏢
Project Name: Provide the project name that will contain the repository. 🛠️
Repository Name: Enter the name of your repository. If it doesn’t exist yet, you’ll need to create it in your source control provider.
Collaboration Branch: Typically, this will be the main or master branch, but you can choose any branch you prefer. 🌳
3.4 Click Next: Networking to move to the networking configuration. 🚦
Step 4: Configuring Networking Options 🌐
Networking configuration is crucial for securing your Azure Data Factory and ensuring it can connect to your data sources.
4.1 In the Networking tab, you’ll have the option to configure Virtual Networks (VNet). If you want your Data Factory to be part of a VNet for enhanced security, enable this option. 🔐
4.2 Configure the Public endpoint settings based on your organization’s requirements. You can restrict access to specific IP ranges or allow public 🛡️
Conclusion and Next Steps 🚀
Congratulations! You’ve successfully deployed Azure Data Factory from the Azure Portal. 🎉 This is just the beginning of your journey with Azure Data