🛡️Azure Databricks Series: Step-by-Step Guide to Setup Databricks Workspace with VNet Injuction🛡️
Welcome to the Azure Databricks Series! In this video, we will walk you through the step-by-step process of setting up an Azure Databricks workspace using VNet Injection. Whether you're a data engineer, data scientist, or just getting started with Databricks, this tutorial will help you create a secure and efficient workspace on Azure. Let's dive in and get started!
What is Azure Databricks? 🤔
Azure Databricks is a powerful analytics platform based on Apache Spark. It provides a collaborative environment for data engineers, data scientists, and business analysts to work together on big data projects. With its integration with Azure, Databricks offers a scalable and secure cloud environment for data processing, machine learning, and analytics.
What is VNet Injection? 🌐
VNet Injection is a feature that allows you to deploy Azure Databricks in a custom Virtual Network (VNet). This enables you to control network traffic, apply network security rules, and integrate with other Azure services securely. By using VNet Injection, you can ensure that your Databricks workspace is isolated from other resources and follows your organization's network security policies.
Why Use VNet Injection? 🛡️
Enhanced Security: VNet Injection provides network isolation, reducing the risk of unauthorized access to your Databricks workspace.
Network Control: You can control inbound and outbound traffic to and from your Databricks workspace using Network Security Groups (NSGs) and Azure Firewall.
Integration: Easily integrate your Databricks workspace with other Azure services within your VNet, such as Azure Storage, Azure SQL Database, and more.
Prerequisites 📋
Before we begin, make sure you have the following prerequisites:
Azure Subscription: An active Azure subscription.
Resource Group: A resource group in which you will create your Databricks workspace.
Virtual Network (VNet): A pre-configured VNet where you want to deploy your Databricks workspace.
Subnet: A dedicated subnet within your VNet for the Databricks workspace.
Permissions: Ensure you have the necessary permissions to create resources in your Azure subscription.
Step-by-Step Guide 🛠️
Step 1: Create a Resource Group 🏗️
Navigate to Azure Portal: Go to the Azure Portal (https://portal.azure.com).
Create Resource Group: Click on "Resource groups" in the left-hand menu, then click "Add".
Fill in Details: Enter the resource group name, select your subscription, and choose a region. Click "Review + create" and then "Create".
Step 2: Create a Virtual Network (VNet) 🌐
Navigate to Virtual Networks: In the Azure Portal, click on "Virtual networks" in the left-hand menu, then click "Add".
Fill in Details: Enter the VNet name, select your subscription and resource group, and choose a region.
Configure IP Addressing: Under "IP Addresses", configure the address space and subnets. Make sure to create a dedicated subnet for Databricks.
Review and Create: Click "Review + create" and then "Create".
Step 3: Create a Network Security Group (NSG) 🛡️
Navigate to NSGs: In the Azure Portal, click on "Network security groups" in the left-hand menu, then click "Add".
Fill in Details: Enter the NSG name, select your subscription and resource group, and choose a region.
Review and Create: Click "Review + create" and then "Create".
Step 4: Create an Azure Databricks Workspace 🔧
Navigate to Azure Databricks: In the Azure Portal, click on "Azure Databricks" in the left-hand menu, then click "Create".
Fill in Details: Enter the workspace name, select your subscription and resource group, and choose a region.
Advanced Options: Click on "Networking" and choose "Deploy Azure Databricks workspace in your own Virtual Network".
Configure VNet Injection: Select your VNet and the dedicated subnet. Choose the NSG created in the previous step.
Review and Create: Click "Review + create" and then "Create".
Step 5: Configure Network Security Rules 🔒
Navigate to NSG: Go to the NSG created earlier and click on "Inbound security rules".
Add Rules: Add the necessary inbound security rules to allow traffic to and from the Databricks workspace. Ensure you allow SSH, HTTPS, and other required ports.
Outbound Rules: Similarly, configure outbound security rules to control the traffic leaving the Databricks workspace.
Step 6: Access the Databricks Workspace 🚪
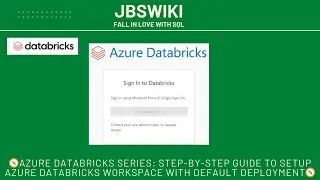
Navigate to Azure Databricks: In the Azure Portal, go to your Databricks workspace.
Launch Workspace: Click on "Launch Workspace" to open the Databricks environment.
Configure Workspace: Follow the on-screen instructions to complete the initial setup of your Databricks workspace.
Conclusion 🎉
Congratulations! You have successfully set up an Azure Databricks workspace with VNet Injection. This setup ensures that your Databricks environment is secure and isolated within your custom VNet. Now you can start using Databricks for your data processing and analytics needs.
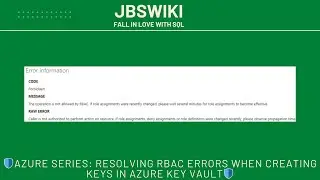
Troubleshooting Tips 🛠️
If you encounter any issues during the setup process, here are some

![[FREE] SLIMESITO x BEEZYB TYPE BEAT 2022 -](https://images.videosashka.com/watch/1EoTITwenvE)