How To Fix Error 0x800704cf The Network Location Can't be Reached
For systems connected as a part of the domain, we can use the same WORKGROUP to share files and folders. This sharing is done through network connections and it is important that all network locations must be well defined. Some times when we try to click on a specific share for instance say Storage, it gives the following error:
Windows cannot access (the share)
Error code: 0x800704cf
The network location can’t be reached. For information about network troubleshooting, see Windows Help.
Windows users, especially Windows 7 and 10 users may get Error code 0x800704cf whenever they try to access Network PC. Here are some tips to fix this error.
How To Fix Error 0x800704cf The Network Location Can't be Reached.
1. Uncheck Client for Microsoft Network
To fix the 0x800704cf error on your system, you simply need to uncheck the Client for Microsoft Network Option. Which in many cases have solved the error code problem for many users. Let's see how it is done.
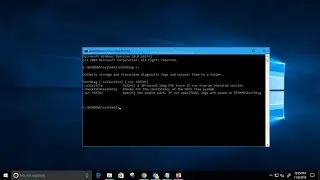
2. Reset TCP/IP stack.
To Reset TCP/Ip will need to execute few commands in the Command prompt window. Make sure you open a Command prompt as administrator to execute the commands mentioned below.
1. Right-click on Start and click on Command Prompt(Admin)
2. Type "ipconfig /flushdns" and hit Enter. This will Clear the DNS Cache.
3. Now again write "nbtstat -RR" before hitting Enter. This will Refresh netBIOS Names.
4. Next type "netsh int ip reset" and Enter to Reset IP settings.
5. Lastly execute "netsh winsock reset" command and hit enter to Reset Winsock Catalog.
3. Re-install Network Adapters.
• Search your PC for "Device Manager."
• Click on the Result shown to Open it.
• Click on View and select "Show Hidden Devices".
• Expand the Network Adapter to see a list of Adapters on your PC.
• Now Uninstall them all One by one.
• Next, Click on Action and Select "Scan for Hardware changes"
4. Make changes on Registry
Note Before making any changes create system Restore point so that if anything goes wrong we can revrt back system to the previous working state using System Restore.
Press + R and put regedit in Run dialog box to open Registry Editor
In the left pane of Registry Editor, navigate to the following registry key:
HKEY_LOCAL_MACHINE\SYSTEM\CurrentControlSet\Services\NetBT\Parameters
Here, make sure that the Value data for TransportBindName registry string (REG_SZ) is set to \Device\. Also, check whether SMBDeviceEnabled named registry DWORD (REG_DWORD) exists or not. If the DWORDexists and has a Value data of 0 assigned, it means direct hosting is disabled. You have change thisValue data to 1, in order to resolve this issue and enable direct hosting. So simply double-click on the registry DWORD to get this:
Finally, set the Value data to 1 in above shown box and click OK. Close Registry Editor and reboot to get the issue resolved permanently.
![[FREE] Digga D x Hazey x M1llionz x Unknown T Type Beat -](https://images.videosashka.com/watch/qfnoLByhXRw)