Mywifiext Login | How to Set Up NETGEAR WiFi Range Extender | Step by Step Guide
Netgear extender setup support helps you understand setup your NETGEAR WiFi Range Extender using the mywifiext.net, netgear genie wizard.
Here is a step by step guide to help you setup your netgear range extender device:-
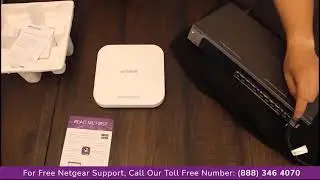
Step 1:- Plug in your extender.
Step 2:-Connect your computer or mobile device to the extender's WiFi network.
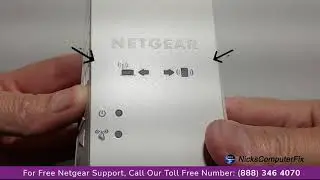
Step 3:-The extender's default WiFi network name (SSID) is NETGEAR_EXT. The extender network either has no password or the default password is a password.
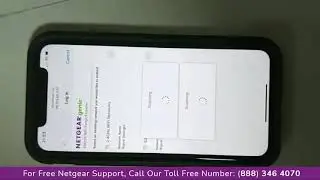
Step 4:-Launch a web browser and enter mywifiext.net.
Step 5:-Click or tap NEW EXTENDER SETUP.
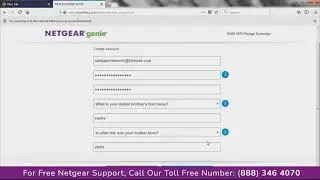
Step 6:-Choose your extender's admin credentials.
These credentials are used to access your extender's settings on a web browser.
We recommend leaving the default User Name as admin and choosing a password that is different from your WiFi network password.
Step 7:-Select and answer two security questions from the drop-down menus.
These questions are used to recover your extender's admin credentials if you forget them.
Step 8:-Click or tap NEXT.
If your extender asks if you would like to use the NETGEAR Genie to help, click or tap YES or CONTINUE.
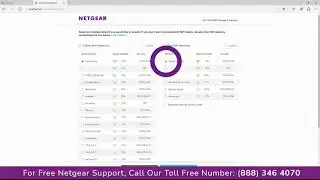
Step 9:-Your extender searches for local WiFi networks.
Step 10:-Select the radio buttons for your network's 2.4GHz and 5GHz WiFi Network Names (SSID).
If you do not see your networks, click or tap See More.
Step 11:-Click or tap NEXT.
Step 12:-Enter your existing network's password and click or tap NEXT.
Select SSIDs and passwords for your extender.
Step 13:-By default, the extender uses the name of your existing network with _2GEXT added to the end for the 2.4GHz band and _5GEXT for the 5GHz band. By default, the password for each band is the same as your existing network.
(Optional) For mesh extenders, you have an option to use the same WiFi name and password as your existing network. Select the Enable One WiFi Name check box to enable this feature if your extender supports it.
Step 14:-This allows your extender to use the same WiFi name (SSID) and password as your existing WiFi network.
Step 15:-Click or tap NEXT.
The extender applies your settings. This can take a few minutes.
Step 16:-The extender displays the WiFi network name (SSID) and password for each of your extender's bands. Take note of these.
On a device that you plan to connect to the extender network, go to the WiFi settings and connect to the extender's new network.
Step 17:-Go back to your web browser, select the checkbox at the bottom of the page, and click or tap Continue.
Your extender is now extending your network's coverage.
Get Instant Solution to all Problems ⌛
► Visit Our Website For More Info:- https://www.paulsguide.net
► Call Netgear Support:- +1-888-245-4797 (Toll-Free Number)
This Video is the work of the Netgear support team
DISCLAIMER: Please don't go out of your way to or hate on anyone I talk about in my videos, this channel is to educate people and I usually focus on education users through technology.
#NetgearExtender #Extendersuppport #Netgear #Setup #Guide #techsupport
Copyright Disclaimer Under Section 107 of the Copyright Act 1976, allowance is made for, fair use, for purposes such as criticism, comment, news reporting, teaching, scholarship, and research. Fair use is a use permitted by copyright statute that might otherwise be infringing. Non-profit, educational, or personal use tips the balance in favor of fair use.
Thanks For Watching.