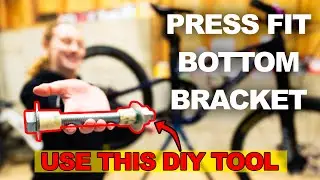
DIY Press Fit Bottom Bracket Tool - SAVE $$$
You could pay a mechanic or use expensive tools to replace your press-fit bottom bracket, the whole process seems expensive and complicated. Here, Nory demonstrates how to use inexpensive DIY tools to get the job done - it's easy! Let us know what you think about this hack in the comments below!
Bottom bracket bearings go bad all the time from exposure to the elements and wear. While threaded bottom brackets are relatively easy to change, many are intimidated to replace a press-fit bottom bracket because specialized tools are required. Not true, any home mechanic can do this!
Replacing a press-fit bottom bracket is quick and easy, and you don't need to buy expensive tools. Nory demonstrates how to remove the old bottom bracket using a punch and hammer. She then presses the new bottom bracket into place using a simple homemade tool.
The DIY tool consists of a long bolt, a single nut, and two large washers. We placed masking tape on the threaded part of the bolt to ensure that the bottom bracket bearings would be centered in the cups. Then it's a simple matter of tightening - easy!
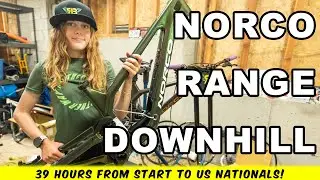
The carbon crankset on Nory's Norco Sight the Samox M7J, they are 155mm long. You can learn more about this crankset and buy online here:
https://samox.com/product/m7j/
You can watch Nory talking about cranksets and installing the Samox M7J carbon cranks for kids here:
• Carbon Cranks for Kids - Installing t...
We hope you LIKE this video, and please do SUBSCRIBE if you'd like to see more of kid-oriented bicycle maintenance and riding. Thanks!
0:00 Intro
0:20 Tools
1:09 Crank removal
2:14 BB removal
3:14 BB install w/DIY tool
4:33 End
#pressfit #bottombracket #diy #maintenance #girlmechanic #homemechanic #savemoney #easyfix #norcobikes #tools #repair #sram #mtb #crankset