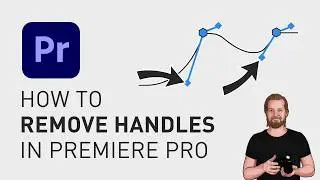
How to remove handles in Premiere Pro
If you want to remove the handles around your keyframes in Adobe Premiere Pro, you can easily do that (either in the “Effect Controls” window) or in the timeline.
The way you do this is by first increasing the track height in the timeline so that you can see the keyframes and right-clicking on the clip and going down to “Show Clip Keyframes” to pick the value you want to show.
Then right-click on any of the keyframes, or hold shift while selecting more keyframes and then right-click on one of them, and then you select “linear”.
This will remove the handles but also the curves so that your values change in a linear way.
I will link more keyframe tutorials at the end of this video so if you like short tutorials like this, don’t forget to subscribe.
**********
EXCLUSIVE RESOURCES FOR VIDEO CREATORS:
🎞 FREE (and paid) digital products for video creators:
https://davidlindgren89.gumroad.com/
🎁 FREE browser extension for YouTube Growth:
https://www.tubebuddy.com/davidlindgr...
🎵 2 extra months of music library "Artlist" for FREE:
https://artlist.io/David-121249
🧠 Learn more about Adobe Premiere Pro:
• How to move clips with the keyboard i...
🧠 Learn more about Adobe After Effects:
• How to edit in Adobe After Effects - ...
**********
📲 CONNECT WITH ME HERE:
► / davidlindgren89
► / davidlindgren89
► / davidlindgren89
► / davidlindgren89
► / davidlindgren89
**********
DISCLAIMER: This video and description might contain affiliate links, meaning if you click any of the product links, I'll receive a small commission. This helps support the channel and allows me to continue making videos like this. Thank You for your support! 🙏
(All links are my genuine recommendations.)
#AdobePremierePro #PremierePro #Tutorials #HowTo
![[FREE] Drake Type Beat -](https://images.videosashka.com/watch/8uxSc9htpIc)
![😍 [v5.5.0] 'New Season, New Dreams' Platinum OBB Patch 🎇 PES 2021 Mobile ✨ Exclusive Legendary Teams](https://images.videosashka.com/watch/c3D434ONCoU)