How to install Tensorflow with PyCharm
How to install Tensorflow with PyCharm
Written and recorded by Aman Chhina. May 2021.
Outline
Installation of python package manager Anaconda/Miniconda. Just general oversight of how to install it using the provided bash script on their installation page.
Verifying conda is installed properly. Create a new environment with conda and install all relevant libraries. Big one being TensorFlow and Keras.
While the downloads are happening for the mentioned libraries, briefly speak about the need for a venv.
Show how to link a new PyCharm project with our venv we just created so we are able to run the ML libraries.
Create a configuration for our test.py file to run and show that there are no errors for the relevant imported libraries.
Transcript
To install TensorFlow we will be using Anaconda a python package manager. Many of you may already have this installed, however if you do not we will first head over to the Anaconda docs installation page. There is a graphic installer available for both Windows and & mac, however there is also installation through the command line for mac and linux. I am currently on a mac, and so I will also be installing it through the command line.
So we will first click this link here and then go come down to the end of the page to install the command-line installer. It's ~500mb so it might take a couple minutes to download. Once it is downloaded we will go to where the file was downloaded to, which will most likely be in the Downloads folder through the command-line. Once we are here we want the run the bash script so Anaconda will be installed in our system and we can then have access to the conda command in our terimnal. We can run the script by entering `bash` and then the full path to the downloaded script.
So first we get the full path, by using realpath, then entering the name of the downloaded file. We simply can enter `bash full_path` and then just follow the prompts and enter yes. I already have Anaconda installed so I won't be isntalling it again, but once it is installed we can verify the installation by entering `conda list`, and if you get a list of the installed packages we know the installation was successful. Alternatively you can check by running conda -V which gives us the conda version that is installed.
Alright, now that we Anaconda installed, we can begin by creating a new virtual environment in which we will install TensorFlow. We can do this by entering `conda create -n test python=3.8`, we want to specify the python version that is compatible with the latest release of TensorFlow, Python 3.6 to 3.8.
Great, so we have created our new environment, and to enter it we simply run the command `conda activate env_name`, and now if we're inside our environment and in case you guys were wondering to exit it we simply type conda deactivate.
Okay, now to actually install TensorFlow, we can use pip. Note this will just install TensorFlow to run through your cpu, to configure it to run through your GPU is a more invovled process in which you'll need a compatible NVIDIA gpu and install the NVIDIA and CUDA drivers. you can read more about that here through the official TensorFlow installation page.
So we run pip install tensorflow, it's also a relatively large package so it will take a couple minutes to download and install, we'll also download keras, and sklearn which are high-level APIs that runs on top of tensorflow and are very often used in conjunction with tensorflow.
Why we need to use a virtual environment to begin with? It's mostly so each project can have it's own dependencies and each time you're running a project you don't have to downgrade or upgrade these dependencies to match the current project you're working on. Another upside is if anyone else needs to run your code you can provide the project level requirements, which won't include all the python packages you have installed throughout your system that you may need in other projects.
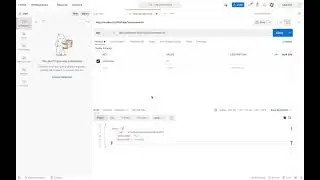
Okay great, we have everything installed and now we can startup PyCharm and link our new environmen. So we create our new project, and we'll then select to use a previously configured interpreter, in which we'll find the file path to the python interpreter. To find where the file path for this interpreter is we can check it by typing in `where python`. In our case we can see the first one is our environment interpreter, so we'll just find this in PyCharm and select it.
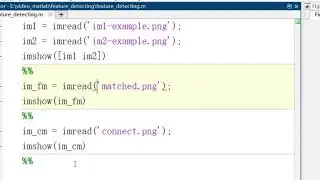
Once we do that, we have configured our project to use the correct interpreter and we should have TensorFlow and Keras available to us. We can check this by making a new test.py file and importing the two modules. If we can import and run these then we'll know everything has worked successfully, so let's go and do that.
Perfect, it ran successfully with no errors, so we know the installation has been successful. Thank you guys for watching this video, please like and subscribe if you found this useful, and happy Machine Learning!


![Jonathan Monsheny - Quand j'y pense | PrésenCiel Studio [LIVESHOW]](https://images.videosashka.com/watch/pMhnLu2Dvos)

![[FREE] Trap Type Beat -](https://images.videosashka.com/watch/vGw9Z9n8E40)