Ornatrix 3ds Max 8: How to create hair from curves?
In Ornatrix for 3ds Max, you can create hair not only from mesh but also from curves. In version 8, the Ground Strands workflow has changed slightly, leading some users to encounter issues with HairFromGuides not working. The reason? It's quite simple. Previously, there was a "Detach Roots" button in Ground Strands; now, it has been replaced with the "Roots Detached" option. To make everything work, you just need to turn off this option.
___
Become a channel sponsor and get a 15%, 50%, 100% discount on all my assets.
It's enough to do it here - / @charlytutors
Also, if this is your first time on this channel, I recommend watching its trailer - • My Channel Trailer - CG Grooming in O...
___
WHO AM I?
Hi, I'm Andrew Krivulya Charly, a 3d-groom artist since 2016.
New works can be viewed here - https://www.artstation.com/artofcharly
I worked on environment art, interiors and more from 2009 to 2016. Check out some of my old work here - https://bit.ly/31xmZsi
___
TIMING:
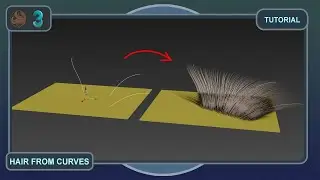
0:00 - In the scene, we have a spline and a plane. The goal is to turn these curves into hair.
0:04 - First of all, always perform a Reset Xform on all objects.
0:11 - Next, make sure to align the pivot points of the curves with the object to which the hair will be attached, in this case, the plane. To do this, click the "Affect Selected Only" button and use the shortcut SHIFT+A to select the object.
0:15 - Also, click "Align to World."
0:20 - After selecting the curves, click on the hair icon with a plus sign and choose "HairFromCurves."
0:25 - This will create the basic modifiers, but that's not enough.
0:28 - First, in Ground Strands, you need to link the plane to the Distribution Mesh.
0:34 - Then, make sure to disable the "Roots Detached" option.
0:39 - Add "Edit Guides" using this icon, and then "HairFromGuides."
0:47 - That's it! The hair will now grow from the guides.
0:50 - If needed, increase the percentage of hair displayed in the viewport, as well as the hair count.
1:00 - Increase the radius in "Change Width" if necessary.
1:04 - Enable HQ mode for the viewport, and if needed, adjust the shader following this tutorial - • Ornatrix 3ds Max | Customize the view...
1:12 - Hide the object selection outlines. Personally, I find them distracting and unhelpful when working with hair.
1:23 - Additionally, if necessary, adjust the hair growth area in relation to the curves.
1:43 - Links to other videos, subscription to Artstation and the channel.
___
CHANNEL SUPPORT:
If you want to support this channel, then throw your donations here:
➡️Donate - https://donatello.to/charlytutors
➡️Support Ukraine - • Stork Guardian For help Ukraine | CGT...
___
USEFUL LINKS:
➡️The main channel - / andrewkrivulya
➡️ARTSTATION - https://www.artstation.com/artofcharly
➡️Instagram - / 3dgrooming
➡️Telegram - https://t.me/grooming3dblog
➡️Twitter - / artofcharly
➡️Miscellaneous interviews and magazines with me - https://bit.ly/2MEZici
___
Enjoy watching!
Best regards,
Andrew Krivulya Charly.
___
MUSIC:
Production Music courtesy of Epidemic Sound" www.epidemicsound.com
___
#ornatrix #3dsmax #3dgrooming