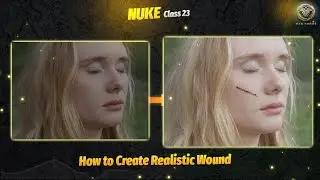
How to Compose Realistic Wound in Nuke | Smart Vector | BY VFX FORGE
Assets used - https://drive.google.com/file/d/1plBL...
Here's a step-by-step guide on how to create a realistic wound using Nuke, focusing on digital compositing for VFX:
1. Setting Up the Project
Footage Preparation: Import your footage where the wound needs to appear. Make sure the footage is clean and well-shot with proper lighting.
In Nuke, start by reading the footage using a Read node.
2. Tracking the Area
Track the Movement: Use Nuke’s 2D Tracker or Planar Tracker (if the area is flat) to track the surface where the wound will appear. This will ensure that the wound moves naturally with the body.
Select the part of the footage where the wound will be, and apply the Tracker node.
Ensure you track properly throughout the entire sequence.
3. Adding the Wound Texture
Import the Wound Image: Choose a pre-made wound texture (from reference or created in Photoshop/ZBrush).
Add the image using another Read node and position it using a Transform node to fit the desired area of the footage.
4. Match the Lighting and Skin Tone
Adjust the Color: Use ColorCorrect and Grade nodes to match the wound’s color with the skin tone. Fine-tune the Gain, Gamma, and Lift to match lighting on the skin.
Add Blur to soften the edges, making the wound blend seamlessly into the surrounding area.
5. Masking the Wound
Roto Shape: Use a Roto node to create a mask around the wound, ensuring that only the wound area shows and it blends naturally with the skin. Animate the mask if necessary to match movement.
6. Adding Depth and Detail
Shadowing: Add a Multiply or Grade node to simulate shadows beneath the wound, giving it a sunken, 3D appearance. Use a Soft Light blend mode for subtle shadows.
Specular Highlights: Use Highlights or Glow nodes to replicate the wet, shiny appearance of a fresh wound.
7. Integrating Blood
Blood Effects: Add additional blood elements using stock footage of flowing blood or manually create blood using Paint nodes. Use motion blur to add realism, especially for dynamic shots.
8. Finalizing with Additional Effects
Motion Blur: If the wound moves significantly, apply motion blur to the wound using the Vector Blur node to match the footage’s natural movement.
Grain: Add a Grain node to match the grain of your wound texture to the original footage, ensuring it blends seamlessly.
9. Rendering the Final Shot
Once everything is composited properly, review the shot frame-by-frame.
Render the final shot using a Write node and export it in the desired format for your project.
Class 1 - • Full Complete Course for NUKE COMPOSITORS ...
Class 2 - • Full Complete Course for NUKE COMPOSITORS ...
Class 3- • Full Complete Course for NUKE COMPOSITORS ...
Class 4 - • How to do Sky replacement in NUKE | Full C...
Class 5 - • Veda VFX Revealed: The Secrets Behind the ...
Class 6 - • How to Screen Replacement in Nuke PART 1 |...
Class 7 - • How to Screen Replacement in Nuke PART 2 |...
Class 8 - • Advanced Class For Tracking Part 3 |Full C...
Class 9 - • How to Remove Green Screen in NUKE | Chrom...
Class 10 - • Full Keying Process Explained in Detailed ...
Class 11 - • Full Keying Process Explained in Detailed ...
Class 12 - • Full Keying Process Explained in Detailed ...
Class 13 - • Mastering Day to Night Scene Conversion in...
Class 14 - • Convert 2d image into 3d world Mastering 3...
Class 15 - • Advanced Keying in Nuke | Edge Despill and...
Class 16 - • Advanced technique for Fixing edge of Gree...
