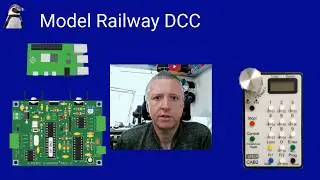
Model Train Automation with Raspberry Pi and Arduino - Part 1 - Converting AC to DC
This is part of a series of videos on controlling a train on a model railway using a Raspberry Pi or Arduino. This is relevant to both outdoor G-Scale railways and HO / OO railways using an analog power supply which is controlled using a Raspberry Pi or Arduino.
Most train sets are usually supplied with an AC plug-in transformer. The controller normally converts from AC to DC. To use the normal railway power supply then the circuit needs to handle the conversion from AC to DC. This shows how to use a full-wave bridge rectifier to convert the AC power supply to DC.
#modelrailway
If you find this video useful please like and share the video and leave me comments below if you have suggestions for future videos.
#gscale
Details of the full series:
Part 1 - A.C. to D.C. Bridge Rectifier
• Model Train Automation with Raspberry...
Part 2 - Forward or Backwards using a H-Bridge
• Model Train Automation with Raspberry...
Part 3 - Controlling speed using PWM
• Model Train Automation with Raspberry...
Part 4 - Detecting the train with a reed switch
• Model Train Automation with Raspberry...
Part 5 - IoT (Internet of Trains) Controlling a train using a web browser (Raspberry Pi only)
• Model Train Automation with Raspberry...
More details about model railway automation see:
http://www.penguintutor.com/projects/...
More details on the g-gauge garden railway project see:
http://www.penguintutor.com/projects/...
#raspberrypi
Video contents:
00:00 Introduction to model railway automation
01:26 The controller that comes with your train set
02:47 Mains electrical transformer to step down the voltage to around 16 to 19V AC
03:46 AC electrical waveform
05:20 Bridge Rectifier (full-wave rectifier)
06:34 Waveform for bridge-rectifier output
07:08 Waveform with capacitor smoothing
08:28 Bridge rectifier integrated package - SKB2/02 or KBP series rectifier
09:34 Summary