Setup Adsense Auto Ads Wordpress: Step by Step
Enable / Setup Google Adsense Auto Ads on Wordpress: Step by Step Video
Full Article: https://mrvirk.com/how-to-setup-adsen...
Step by Step Guide – Auto Ads Implementation
This guide contains easy to follow steps with screenshot examples covering all the necessary steps needed –
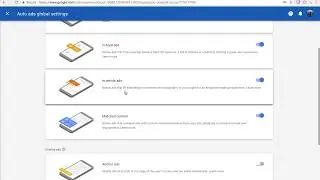
How to Enable Auto Ads
How to Implements Auto Ads in WordPress.
Pre-requisite
Approved Google Adsense Account
Access to WordPress Dashboard
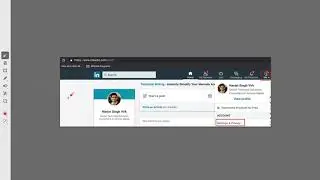
Enabling Adsense Auto Ads
Implementing Adsense Auto Ads
To implement Adsense auto ads on your website.
Paste your Auto Ads code (which you get once you have enabled auto ads as described in the video above) in the head tags on your website.
Steps Involved in How to Setup Adsense Auto Ads in WordPress
a- Login to Your WordPress website
(you can login to wordpress by placing /wp-login.php behind your website url).
Example: mrvirk.com/wp-login.php
You may be interested in this article: How to login into WordPress Website
b- Now Open your WordPress Website Dashboard
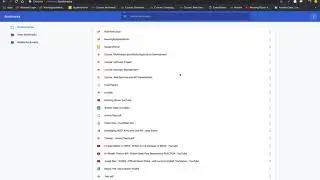
c- We need to Edit – header.php file.
Follow the steps below to find your header.php file.
1- Dashboard
2- Hover over – Appearance
3- Click Editor
4- Now an Editor Opens – Listing Several files
5- Find and Choose header.php file
or you can skip steps 1 to 5 and instead place /wp-admin/theme-editor.php?file=header.php behind your domain/website url, this url will open header.php file in editor for you.
Example: mrvirk.com/wp-admin/theme-editor.php?file=header.php
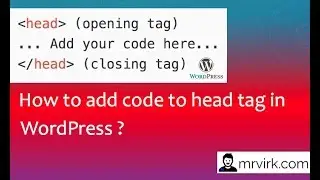
Towards the top of the file you will see head tags
Example:
head tag
Head Tag
Now, paste your adsense auto ads code just above the closing head tag.
Save the file.
(Don’t forget to save as the changes will be lost. Since, the change are not autosaved).
If you ever change you mind here is how to disable them ?
How to Setup Adsense Auto Ads in WordPress ?
How to Setup Adsense Auto Ads in WordPress ?
What are the Available Ad Types in Google Adsense Auto Ads ?
Text and Display Ads
In-feed ads
In-article ads
Matched Content
Anchor Tags (not recommended)
Vignette ads

![[AMV] верно, я Кира..](https://images.videosashka.com/watch/8-3v0E_Axvw)