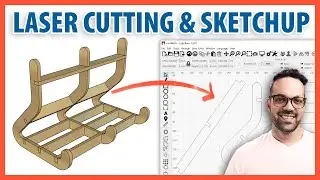
Designing Paper Packaging in SketchUp | Exporting TRUE curves | Importing to Cricut Design Space.
Here's the process for designing a 3D paper packaging project in SketchUp, then exporting it to Cricut design space to create on the Cricut Maker.
1: Use one component for each "fold" of paper.
2: Create a folded version and a flat version so you can see how the folds interact, and how it look laid flat.
3. When ready to export, create a copy of the flat version, and explode it.
4. Isolate edges by tool type (cut vs score), by using groups.
5. Use the Weld plugin to create polylines (or do this in Illustrator after export).
6. Place raw geometry on layer to distinguish tool type (cut vs score).
7. Delete faces (Curves don't export properly if faces are attached.)
8. Hide entities you don't want to export.
9. File - Export - 3D Model. Choose DXF. (3D DXF is what exports true curves!)
10. Click Options, choose edges only, Release 14.
11. In Illustrator, open the dxf.
12. Set "Scale by: 100%", set your units to match the units from SketchUp.
13. Select all - Right-click - collect for export.
In Cricut design Space
1. Upload Image - select image
2. Set tool path type
3. Select all - attach.
Make!
Cricut Maker on Amazon (Affiliate Link) https://mastersketchup.com/cricutamz
Cricut Maker on Cricut's site (Affiliate Link) https://mastersketchup.com/cricutmaker
★★★ MY BOOKS ★★★
SketchUp to LayOut 2015- https://SketchuptoLayout.com
SketchUp & LayOut for Architecture - https://SketchUpbook.com/
★ SUBSCRIBE TO MY CHANNEL ★
https://youtube.com/subscription_cent...
★ FOLLOW ME ★
Tutorials & Videos - https://www.mastersketchup.com
Facebook - / mastersketchup
Twitter - / mastersketchup
★ MORE SKETCHUP RESOURCES ★
https://www.mastersketchup.com/resources
![roblox# 456 [ Undertale legacy Fight timeline 3 ] [ All Strong Character + All Ulter Character ]](https://images.videosashka.com/watch/08KOpc48-Qc)