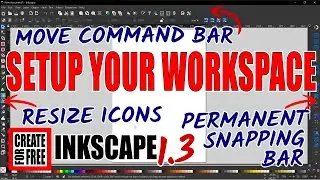
Flow Text around a Photo Inkscape
Flowing text around an object or shape in a photo is a great way to make your designs come to life.
In this tutorial I show you how you can create a frame that fits neatly around an object in your design and then we’ll place text in the frame. I’ll show you 2 ways to adjust the size of your text so you can perfect the look of your project quickly and easily.
I demonstrate a couple of ways to create a path that follows the shape of an object – Using the paint bucket tool is a great way to quickly create a complex path, but sometimes it’s simpler to use the Bezier tool to create a path – so in this video I show you step by step how to draw a path using both methods.
I also teach you how to create demo text using the Lorem Ipsum Text Extension – handy when you’re making mock-ups and I introduce you to a few of the Path Functions – also called Boolean Operators.
If you want to learn more about the topics covered in this video click on one of the links below or visit ‘Create For Free’ at:
/ createforfree
Here are some videos to learn more:
Learn all about the Paint Bucket Tool:
• Paint Bucket Tool Inkscape
Learn how to create and perfect paths with the Bezier pen and Nodes tool:
• Inkscape Bezier Pen Tool
Learn how to use path functions (or Boolean operators) to build up shapes:
• Inkscape Path Functions and selection...
A little bit of knowledge can go a long way – so let's get creative.
Follow along with ‘Create For Free’ to create your own artwork – for Cricut, print on demand good, low content publishing with KDP, T-shirt designs, etc.
In this tutorial, I’m using the latest version of Inkscape – Inkscape 1.1.2
For more tips, tricks and tutorials, visit Create For Free at:
/ createforfree
#createforfree #inkscape #text
Inkscape logo by Andrew Michael Fitzsimon