Easy Guide for Beginners: Install Requirements.txt in a Python Virtual Environment using VS Code
Just getting started with Python and VS Code? Don’t worry, I’ve got you covered! In this beginner-friendly tutorial, I’ll walk you through the step-by-step process of installing all the dependencies from a requirements.txt file inside a virtual environment using VS Code. No need to feel overwhelmed—it's easier than you think! 🎯
🔹 What you’ll learn:
How to create and activate a virtual environment in VS Code.
The simplest way to install all your packages using requirements.txt.
Tips to make managing your Python projects smooth and hassle-free.
This video is perfect for anyone new to coding or setting up Python environments for the first time. Hit that 👍 button, subscribe, and leave a comment if you found this helpful—let's make learning Python fun and easy!
🔹 Pre-requistics
1. Install Python. Check this link: 👉🏻 • How to Instantly Update Python on mac...
🔹 Commands used
1. python --version
2. python -m venv (name you want to give to environment). For Example : python -m venv clonem
3. source (name of your virtual environment)/bin/activate. For example : source clonem/bin/activate
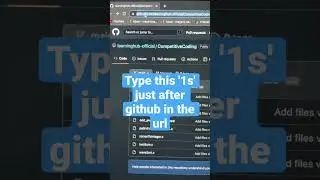
4. git clone (Repo Link) For example : git clone https://github.com/learninghub-offici...
5. pip install -r requirements.txt
🔹 Time stamp for ease
00:22 Setting up Virtual environment
03:40 Installing requirements.txt
04:40 Deactivating Virtual environment