Intro to Raspberry Pi Pico and RP2040 - C/C++ Part 2: Debug with Picoprobe | Digi-Key Electronics
In the previous video ( • Intro to Raspberry Pi Pico and RP2040... ), we showed you how to configure VS Code to create simple C programs using the Pico SDK. This time, we install OpenOCD and GDB in order to provide step-through debugging of programs on the Raspberry Pi Pico.
You can read a written version of this tutorial here: https://www.digikey.com/en/maker/proj...
Note that you will need a second Raspberry Pi Pico device to act as the debugger.
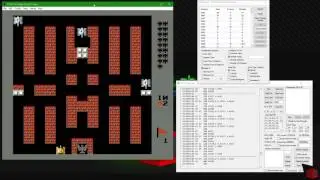
We will program one Pico with the picoprobe firmware to act as the debugger. That device will be connected to the target device (which will run the blink program we created in the first tutorial) over SWD. We can use VS Code as a graphical debugger environment, which will call functions in GDB. GDB will send commands to OpenOCD, which runs as a server in the background. OpenOCD communicates with the picoprobe firmware over USB in order to control the target Pico.
You will need to build the Pico-specific version of OpenOCD by following the guide in Appendix A of the Pico Getting Started Guide (https://datasheets.raspberrypi.org/pi.... If you are on Windows, you can also follow the guide here (https://shawnhymel.com/2168/how-to-bu...) to build OpenOCD or download the pre-compiled executable here (http://bit.ly/pico-tools-windows).
To start, you will need to download and build the picoprobe firmware (https://github.com/raspberrypi/picopr.... Upload the picoprobe.uf2 file to the debugger Pico after you put it into bootloader mode.
If you are on Windows, you will need to install the libusb-win32 driver using Zadig (http://zadig.akeo.ie/).
From there, you can install the Cortex-Debug and C/C++ extensions in VS Code. These will allow you to run OpenOCD and GDB in the background while giving you graphical tools to step through lines of code and peek at memory values.
Product Links:
https://www.digikey.com/en/products/d...
Related Videos:
Intro to MicroPython – Maker.io Tutorial - • Intro to MicroPython – Maker.io Tutor...
Intro to Raspberry Pi Pico and RP2040:
Part 1: VS Code and Blink - • Intro to Raspberry Pi Pico and RP2040...
Part 2: Debug with Picoprobe - • Intro to Raspberry Pi Pico and RP2040...
Part 3: How to Use PIO - • Intro to Raspberry Pi Pico and RP2040...
Related Project Links:
https://www.digikey.com/en/maker/proj...
Related Videos:
Intro to MicroPython – Maker.io Tutorial - • Intro to MicroPython – Maker.io Tutor...
Intro to Raspberry Pi Pico and RP2040 - C/C++ Part 1: VS Code and Blink - • Intro to Raspberry Pi Pico and RP2040...
Intro to Raspberry Pi Pico and RP2040 - C/C++ Part 2: Debug with Picoprobe - • Intro to Raspberry Pi Pico and RP2040...
Related Articles:
Introduction to MicroPython - https://www.digikey.com/en/maker/blog...
Raspberry Pi Pico and RP2040 - MicroPython Part 1 - https://www.digikey.com/en/maker/proj...
Learn more:
Maker.io - https://www.digikey.com/en/maker
Digi-Key’s Blog – TheCircuit https://www.digikey.com/en/blog
Connect with Digi-Key on Facebook / digikey.electronics
And follow us on Twitter / digikey


![Not Found [Maker Update] | Maker.io](https://images.videosashka.com/watch/JKoLZEK4jXw)


![Tumbling Towards Tea Time [Maker Update] | Maker.io](https://images.videosashka.com/watch/94EVgYAAhAQ)