Photo to Oil Painting Effect in photoshop | Photoshop tutorial
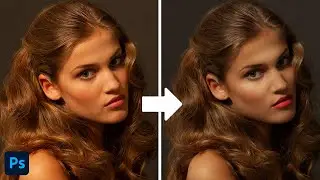
Photo to Oil Painting Effect in photoshop
Transform a Photo to a Realistic Oil Painting
---------------------------------------------------------------
Make Sure You SUBSCRIBE Our Channel So You Don't Miss Any Upcoming Videos!
► SUBSCRIBE for more Photoshop Tutorials : https://bit.ly/346uH1D
Thanks to everyone who is subscribing to my channel and adding me as friend. Thankyou! :)
---------------------------------------------------------------
Song: Ehrling - You And Me (Vlog No Copyright Music)
Music provided by Vlog No Copyright Music.
Video Link: • Ehrling - You And Me (Vlog No Copyrig...
---------------------------------------------------------------
Work steps :
1) Right-click on the layer and select Convert to Smart Object
2) Go to Image_Adjustments_Shadows/Highlights...
3) Go to Stylize_Oil Paint...
4) GO to Filter_Sharpen_Smart Sharpen...
5) Go to Filter_Blur_Surface Blur...
6) Go to Filter_Filter Gallery...
7) Select Brush Strokes and click on the Accented Edges
8) Go to Filter_Noise_Add Noise...
9) Go to Filter_Other_High Pass...
10) Double click on the High Pass Filters to open the Filter page for us
11) Change the Blending Options from Normal to Overlay
12) Go to Filter_Filter Gallery...
13) Select Texture and click on theTexturizer
14) With the Ctrl+J take a copy of the original layer, right-click on the copy layer on the filters section, and select the Clear Smart Filters
15) Go to Filter_Blur_Gassian Blur...
16) Click on Adjustment Layer and click on Invert
17) Click on Adjustment Layer and click on Black & White...
18) Select the top 3 layers and turn them into a group
19) We change the group Blending mode from Pass Through to Overlay
20) And we reduce the Opacity
21) The End
I hope today's training was useful for you
---------------------------------------------------------------
#Potoshop#OilPaintEffect#7Learn