ArchiCAD Tutorial | Custom Objects Pt. 3 - Combine 2D & 3D; Interactive Schedule Subtypes
The third and final part of my series on creating custom objects; an excerpt from my comprehensive Best Practices Course ArchiCAD training - http://www.acbestpractices.com.
I will be posting a PLN file with the custom objects that you will be able to download - check back here in the next few days for a link.
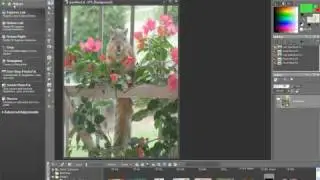
In this tutorial I show you how to combine 2D and 3D elements together to create a custom object with a detailed 2D symbol as well as any level of 3D modeling.
To make it easy for integrating these new objects into an Interactive Schedule (such as an Equipment Schedule), you can change the Object Subtype to match other elements that go into the same schedule, which will add Listing parameters that can be filled in directly in the schedule or within the Object Settings dialog.
One other "trick" is shown that simplifies setting a parameter for text shown as part of the object on the floor plan. A quick revision to the GDL script allows the object to pick up the ID information from the Info Box to show this text on the plan. This can be much faster than opening the object settings dialog to change the parameter value.
DETAILED DESCRIPTION OF THIS ARCHICAD VIDEO TUTORIAL
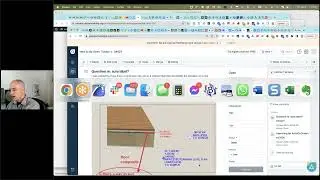
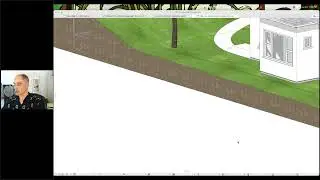
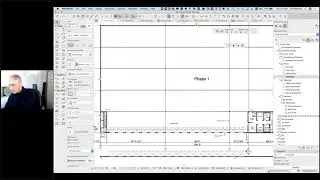
In this video, we go further and combine 2D and 3D elements into a compound library part. The symbol is derived from the plan representations of the elements, while the 3D model information is based on the 3D elements incorporated into the new object.
Optimization of the hotspots or selection handles is done in the same way as before: placing Hotspots manually wherever you want to be able to insert, select or snap to the element, and including these hotspots in the selection while creating the object. Remember to turn off the Bounding Box hotspots in the Details -- Compatibility Options section of the object editing dialog.
Another variation is shown for setting the text that will be shown on the floor plan for certain objects. In this case, the script is changed to use the Object ID instead of a custom parameter; this is done by typing in the global parameter reference GLOB_ID in place of the original quoted text (e.g. GLOB_ID replaces "ABC", and there are no quote marks or inverted commas surrounding GLOB_ID).
I demonstrate how you can move the ID input to the left side of the Info Box using the controls in the Options menu -- Work Environment -- Info Box -- Object. This will speed up setting the desired ID for elements on the plan, since you won't have to scroll in the Info Box to see the ID field.
New custom objects are set up by default in ArchiCAD to use a "subtype" called "Model Element". For the new object to be usable within Interactive Schedules such as Appliance or Equipment Schedules, change the Object Subtype in the Details section of the object creation dialog, and resave the object. To make the best match possible, open up a similar standard library object by selecting it on the plan and using the File menu -- Libraries and Objects -- Open Object command (or the keyboard shortcut Command-Option-O or Shift-CTRL-O) and verify the Object Subtype for that part.


![ЛЕГИОНКА ДЕЛО ГОВОРИТ [DOTA2]](https://images.videosashka.com/watch/DHkwP_b-NiI)